Alright, fellas (and ladies!), let's talk about building a tool chest. Not just any ol' tool chest, but a DIY wooden tool chest that's gonna be the envy of your neighbors and the pride of your garage.
You know that feeling, right? You're in your garage, digging through a jumbled mess of tools, and you swear you saw that wrench just last week. You're wasting time, getting frustrated, and risking a tetanus shot from that rusty old screwdriver. It's time to get organized, my friend, and there's no better way than with a solid, custom-built wooden tool chest.
What You'll Need:
First things first, let's gather our supplies. This ain't a trip to the hardware store for a pack of screws, folks. We're talking about building a masterpiece, so we'll need the good stuff.
Wood: You've got choices here. Plywood is strong and affordable, but if you want to show off, go with solid wood like oak, maple, or cherry. You'll need at least three sheets of plywood or enough solid wood for the sides, top, bottom, and dividers. Don't forget the wood for the hinges and handle.
Screws: You'll need lots of screws, in different sizes. We're talking about wood screws, not drywall screws, because we want this thing to hold up for decades.
Glue: A good quality wood glue is essential for strong joints.
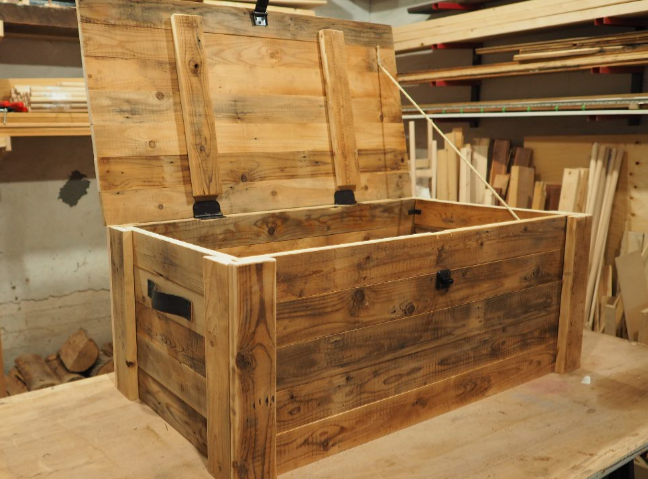
Hinges: Strong, heavy-duty hinges are a must for a tool chest that's gonna be slammed open and closed a million times. Get the ones that say "heavy-duty," not the flimsy ones that'll bend like a pretzel after a few months.
Handle: This is where you can get creative. You can use a simple metal handle or a more decorative wooden handle. Just make sure it's comfortable to grip and strong enough to hold the weight of the chest.
Finishing Supplies: Sandpaper, stain, paint, or varnish. Pick whatever suits your style.
Tools of the Trade:
Now let's talk about the tools you'll need. You probably already have most of them, but if you don't, borrow 'em from a neighbor or pick them up at your local tool rental shop.
Circular saw or table saw: You'll need a saw to cut your wood. A circular saw is more portable, while a table saw is more precise.
Jig saw: A jig saw is great for making curved cuts, like for the handle.
Power drill and drill bits: For drilling pilot holes and attaching the hardware. Don't forget a drill bit that's a little smaller than your screw diameter. You want those screws to go in smooth, not strip the wood.
Screwdriver: For driving in screws, you can use a powered screwdriver or a manual one.
Measuring tape and pencil: You'll need these for marking your cuts and layout.
Clamps: To hold your pieces of wood together while you glue and screw them.
Safety gear: Safety glasses, ear protection, and dust mask. Safety first, always!
Time to Build!
Now, let's break down the building process step by step:
1. Cut Your Wood: Start by cutting your wood to size. Measure carefully and mark your cuts with a pencil. You'll need two pieces of wood for the sides, two for the top and bottom, and enough for the dividers.
2. Assemble the Box: Glue and screw the sides, top, and bottom together to form a box. Use clamps to hold the pieces together while the glue dries. Make sure the corners are square and the top and bottom are flush.
3. Add the Dividers: Cut your divider pieces to size and glue and screw them into place. You can create whatever configuration of dividers you need for your tools.
4. Attach the Hinges: Mark the location of the hinges on the lid and the box, then drill pilot holes and attach the hinges.
5. Attach the Handle: Measure the location of the handle and drill pilot holes. Then attach the handle using screws.
6. Finish It Off: Sand the entire tool chest to a smooth finish. Then, apply your chosen finish. Stain, paint, or varnish â€" whatever you want, just make it look good!
Tips and Tricks:
Here are a few tips to make your tool chest build even better:
Use a template: Create a template for your dividers using cardboard. This will ensure that all of your dividers are the same size and shape.
Pre-drill pilot holes: This will prevent the wood from splitting when you drive in screws.
Clamp your joints: Use clamps to hold your joints together while the glue dries. This will ensure a strong bond.
Sand thoroughly: A smooth finish is important for a tool chest that's going to be handled a lot.
Don't rush: Take your time and do a good job. This tool chest is gonna last you a lifetime.
A Few More Ideas:
Here are some ways to add some extra flair to your tool chest:
Inlays: Use a contrasting wood to create a unique design on the top or the sides.
Carvings: Carve a design into the wood, like a tool or a logo.
Metal accents: Add metal trim around the edges of the tool chest or use metal screws for a more industrial look.
Final Thoughts:
Building a DIY wooden tool chest is a rewarding experience. You'll have a custom-built tool chest that's not only functional but also a statement piece in your garage. So, gather your tools, get your wood, and start building. Your garage (and your tools) will thank you for it!
0 comments:
Post a Comment